API documentation
This section shows how I document APIs.
Note
I documented APIs for internal use only, so the following section show either APIs I developed in Python for personal projects or part of some APIs I integrated for my clients (this shows only partial code. Furtermore, refactored and created differently from the actual API).
Zendesk API: OAuth tokens management documentation
This section describes how I created use cases in Python for the Zendesk API and how I documented them.
I created a Python program for a customer that uses the Zendesk API to manage access tokens. They needed a program that could manage access tokens on behalf of their customers to help the support team in their daily tasks, making customers do some operations for them.
The complete program and documentation can’t be shown, so, in this section, I recreated some of the functions, with different code, to show how I document APIs.
Prerequisites
Get a Zendesk subdomain
To use the code in this section, you first need to have a Zendesk subdomain registered.
Here’s the API reference with its documentation for further basic knowledge.
Create an API token
After gaining a Zendesk domain with an admin account, you can create an API token as follows:
Step 1: Log in to your Zendesk account and go to the Admin Center
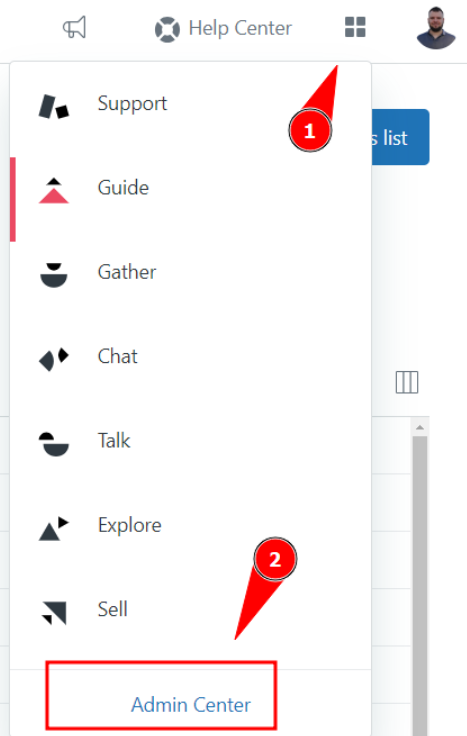
Going to the admin center.
Step 2: Click on Apps and integrations and then on Zendesk API
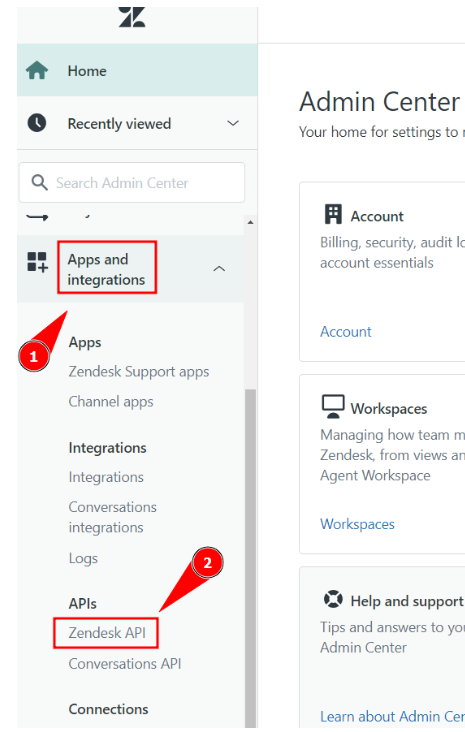
Going to the Zendesk API.
Step 3: Click on Settings. Then, enable the Token access. Finally, click on Add API token
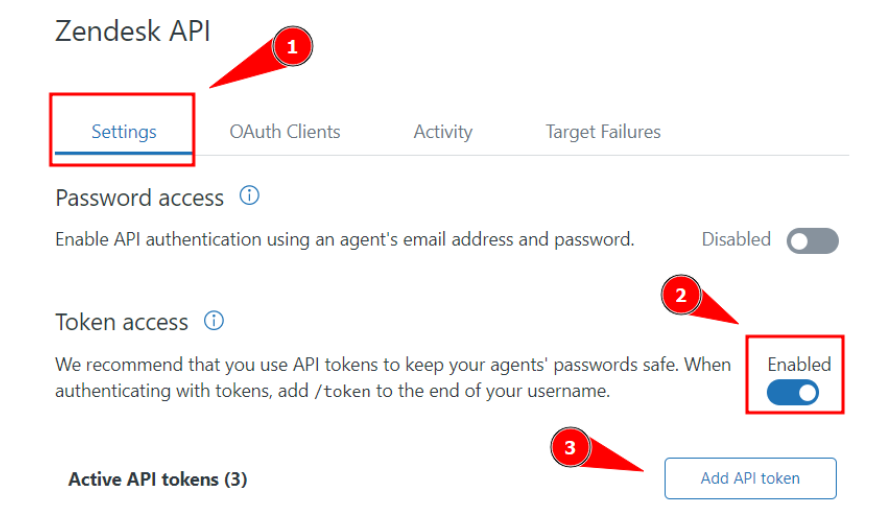
Adding a new API token.
Copy and paste the API token somewhere safe: it won’t be shown again.
Then, save and you’re done.
Python prerequisites
To run the program you need:
Python 3 or later.
The library
requests.
Since the library requests is not in the Python standard library, you need to install it via the command:
1pip install requests
Use cases implementation
This section shows documentet Python code as use cases for the Zendesk API.
Admin authenticator
If you’re working with colleagues, each colleague can be an admin, create an admin API token, and use the program.
The admin authenticator program is called initial.py. It asks you for your:
Your Zendesk login email.
API token.
After authentication, it creates a file called settings.py that stores your:
Zendesk login email.
API token.
Client ID.
Note
You’ll provide your email and API token via CLI. The client ID is retrieved by the software automatically.
Here’s the Python code:
 1import requests
 2
 3# Define the Zendesk subdomain
 4ZENDESK_SUBDOMAIN = "" # Write your Zendesk subdomain
 5
 6# Insert user email
 7email = input(f"\nPlease, insert your Zendesk login email:\n")
 8# Insert user API token
 9token = input(f"\nPlease, insert your Zendesk API token:\n")
10
11def generate_settings(email, token)->None:
12    """ Generates the settings.py file needed to use the main program"""
13    # API request
14    url = f'https://{ZENDESK_SUBDOMAIN}.zendesk.com/api/v2/oauth/clients'
15    auth = (email + '/token', token)
16    headers = {
17    	"Content-Type": "application/json",
18    }
19
20    try:
21        # Get response
22        response = requests.get(url, auth=auth, headers=headers)
23        # Get the clients in the JSON response
24        number_of_ids = len(response.json()["clients"])
25
26        # Iterate to get the client ID
27        for id in range(number_of_ids):
28            print(response.json()["clients"][id]["id"])
29            client_id = response.json()["clients"][id]["id"]
30    except Exception as e:
31        print(e)
32
33    # Write credentials to settings.py file
34    with open("settings.py", "w") as settings_file:
35        settings_file.write(f'EMAIL = "{email}"\n')
36        settings_file.write(f'CLIENT_ID = "{client_id}"\n')
37        settings_file.write(f'API_TOKEN = "{token}"\n')
38        settings_file.close()
39    print(f"\nSuccesfully created your settings file!")
40
41if __name__ == "__main__":
42    generate_settings(email, token)
How to create an OAuth token
This program retrieves the information of an admin stored in the settings.py file and:
Gets authentication to the Zendesk API.
Creates an OAuth token.
Your customers can use the OAuth token in other Python files you have written to authenticate them to the Zendesk API and make some actions on your behalf.
For example, you may want to write a Python file that retrieves the logs on a customer machine and loads them on a Zendesk ticket; let’s call it operator.py. To load them on a Zendesk ticket you need to authenticate your customer and you can safely do so via a OAuth token.
Here’s the code:
 1import base64
 2import json
 3import requests
 4import settings
 5
 6
 7# Define the Zendesk subdomain
 8ZENDESK_SUBDOMAIN = "" # Write your Zendesk domain
 9
10# Retrieve info from the settings file
11email = settings.EMAIL
12token = settings.API_TOKEN
13client_id = settings.CLIENT_ID
14auth = (email + '/token', token)
15
16def generate_token(client_id:str, auth:str)->base64:
17    """Creates an OAuth Token for the Zendesk API"""
18
19    # API request to generate a new token
20    url = f"https://{ZENDESK_SUBDOMAIN}.zendesk.com/api/v2/oauth/tokens.json"
21
22    headers = {
23        "Content-Type": "application/json"
24    }
25
26    data = {
27        "token": {
28            "client_id": client_id,
29            "scopes": ["read", "write"]
30        }
31    }
32
33    response = requests.post(url, headers=headers, json=data, auth=auth)
34
35    # Get token ID
36    oauth_id = str(response.json()["token"]["id"])
37    # Get full token
38    oauth_token = str(response.json()["token"]["full_token"])
39
40    # Insert ticket number
41    zendesk_ticket_number = input(f"Insert the Zendesk Ticket number: ")
42
43    # Mix ticket number, token id, and full token
44    clear_text_msg = f"{zendesk_ticket_number}:{oauth_id}:{oauth_token}"
45    # Encode the mixed values
46    encoded_msg = base64.b64encode(clear_text_msg.encode('utf-8')).decode('utf-8')
47
48    # Return the mixed values
49    print("\nHere's your new token!\n")
50    return encoded_msg
51
52if __name__ == "__main__":
53    generate_token(client_id, auth)
How to revoke active OAuth tokens
When you create OAuth tokens, they will remain stored in the web server, taking space.
It is a good practice to revoke all the active tokens, from time to time.
The following program revokes all the active tokens:
 1import json
 2import requests
 3import settings
 4
 5
 6# Define the Zendesk subdomain
 7ZENDESK_SUBDOMAIN = "" # Write your Zendesk domain
 8
 9# Retrieve info from the settings file
10email = settings.EMAIL
11token = settings.API_TOKEN
12client_id = settings.CLIENT_ID
13auth = (email + '/token', token)
14
15def revoke_all_tokens(auth:str)->None:
16    """Revokes all the OAuth Tokens generated for the Zendesk API"""
17
18    # API request to revoke all the tokens
19    url = f"https://{ZENDESK_SUBDOMAIN}.zendesk.com/api/v2/oauth/tokens.json"
20
21    headers = {
22        "Content-Type": "application/json"
23    }
24
25    response = requests.get(url, headers=headers, auth=auth)
26
27    # Calculate the number of existing tokens
28    number_of_tokens = len(response.json()["tokens"])
29
30    # Store response to a variable
31    response_json = response.json()
32
33    # Iterate to revoke all the existing tokens
34    for arrayn in range(number_of_tokens):
35        token_id = response_json["tokens"][arrayn]["id"] # Get token id
36        url = f'https://{ZENDESK_SUBDOMAIN}.zendesk.com/api/v2/oauth/tokens/{token_id}.json'
37        response = requests.delete(url, auth=auth) # Revoke tokens
38
39        # Verify response
40        try:
41            if response.status_code == 204:
42                print("\nAll the tokens been revoked!\n")
43            else:
44                print("\nThere was a problem while revoking the tokens!\n")
45        except Exception as e:
46            print("\nAn exception occurred: ", e)
47
48if __name__ == "__main__":
49    revoke_all_tokens(auth)
Beam API: training a Machine Learning model on a serverless GPU
Beam is a service that provides Data Scientists and Developers the possibility to run code on a serverless GPU, utilizing their REST API.
I had the possibility to collaborate with them to their documentation, creating a use case that describes:
What are serverless GPUs and why they’re revolutionizing the world of data in terms of development.
How to log in and install the beam CLI on a Linux machine (or, via WSL in Windows).
A use case on how to train a Machine Learning model on the Beam serverless GPU, using its API.
Read the complete use case here.
CoinGecko API: getting crypto values
This section describes a use case for the CoinGecko API.
This use case has been developed by me in Python and the full code is on my GitHub.
Prerequisites
To use the CoinGecko API you first need to create an account on their website.
Then, you need to create an API token. The free plan currently allows you to make 10k API calls per month.
Requirements
The program uses the match statement that, and, at the time of writing this documentation (November 2023), this requires Python 3.10 (or newer versions).
As the program calls an API, you also need the requests library. You can install it via:
1pip install requests
Getting started
When you use this software you need to launch the initial.py file via:
1python3 initial.py
This will create a file, called settings.py, which stores your email and your API token: this way, every time you use this software, you won’t need to insert them.
After that, you can launch the main file via:
1python3 main.py
Here’s how the initial.py file works (code reference here):
The user inserts the email and the API KEY via CLI.
The program checks if the
settings.pyfile exists in the settings folder, then:If exists, it warns the user that the file already exists.
If it doesn’t exist, it creates it and stores the email and the API KEI inserted by the user.
Structure of the main file
After the first usage, always invoke the main file via:
1python3 main.py
Here’s what it does:
It imports the email and the API token from the
settings.pyfile.It prints a welcome message reporting the version of the software.
It tries to authenticate the user.
With a
whileloop, it has a menù that gives the user to choose between three options:Option 1: the user can visualize the price of one crypto in a currency of their choice. Also, the user can choose to store the value of the crypto in a CVS file with the current date.
Option 2: the user can visualize the difference between today’s and yesterday’s price of a crypto.
Option 0: it closes the program by breaking the loop.
Here we document all the functions used.
The authentication function
The authentication function authenticates the user by verifying their email che API token.
This is a use case of the GET/ping method shown in the documentation.
This method has no parameters and returns 200 if the authentication is successful.
In Python, we can test it as follows:
 1# Try access by pinging the dedicated URL
 2try:
 3    ping_url = "https://api.coingecko.com/api/v3/ping"
 4    response = requests.get(url=ping_url, auth=auth)
 5    if response.status_code == 200:
 6        print(f"\nAccess succesfully granted to the API!")
 7    else:
 8        print(f"\nAn error occurred while autenticating. Please: try again!")
 9except Exception as e:
10    print(f"\nAn exception occurred:", e)
Were the authentication is performed from the email and the API token imported from the settings.py file like so (complete code reference here):
1# Import settings from the settings file
2email = settings.EMAIL
3token = settings.API_TOKEN
4auth = (email + "/token", token) # Create authenticator
The price module
This module has two functions that retrieve the price of a currency using the API and make some calculations.
The function visualize_price() calls the API using the GET/simple/price method.
Here’s how this method can be used to show the current price of one crypto with respect to a currency:
 1def visualize_price(auth:str)->None:
 2    """Shows the current price of a crypto with respect to a currency.
 3    The auth variable is created in the main.py file.
 4    """
 5     # User inserts crypto and currency
 6    crypto = input(f"\nChoose your crypto (for example, write 'bitcoin'):\n")
 7    currency = input(f"Choose the currency (for example, write 'usd'):\n")
 8
 9    # API call
10    url_price = f"https://api.coingecko.com/api/v3/simple/price?ids={crypto}&vs_currencies={currency}"
11
12    response = requests.get(url=url_price, auth=auth)
13
14    # Print current price of a crypto in the selected currency
15    try:
16        if response.status_code == 200:
17            data = response.json()
18            print(f"\nThe current price for {crypto} is: {data[crypto][currency]: .1f} {currency}")
19        else:
20            print(f"An error occurred while getting the price: please, try again!")
21     except Exception as e:
22        print(f"An exception occurred while trying to get the currency value", e)
For example, suppose we want to know the current price of bitcoin in USD. Here’s what you’ll see:
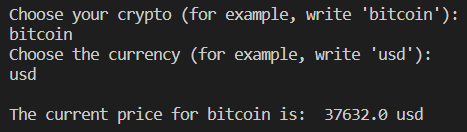
The current price of bitcoin in USD ($).
The function price_change() calls the API using the GET/coins/{id}/market_chart method.
Here’s how this method can be used to calculate the current price of a crypt with respect to a currency and its yesterday’s price. We can also calculate the change in price during the day and print it:
 1def price_change(auth:str)->None:
 2    '''Shows the difference of the price of a crypto in a currency with respect to the value it had yesterday.
 3    The auth variable is created in the main.py file.
 4    '''
 5
 6    # User inserts crypto and currency
 7    crypto = input(f"\nChoose your crypto (for example, write 'bitcoin'):\n")
 8    currency = input(f"Choose the currency (for example, write 'usd'):\n")
 9
10    # API call
11    url_increment = f"https://api.coingecko.com/api/v3/coins/{crypto}/market_chart?vs_currency={currency}&days=1&interval=daily"
12
13    response = requests.get(url=url_increment, auth=auth)
14
15    try:
16        if response.status_code == 200:
17            data = response.json()
18            current_value = data["prices"][1][1]
19            yesterday_value = data["prices"][0][1]
20            change_price = current_value - yesterday_value
21            print(f"\nThe current value of {crypto} is {current_value: .1f} {currency} while yesterday's value was {yesterday_value: .1f} {currency}.\nSo, the price has changed by {change_price: .1f} {currency} from yesterday")
22        else:
23            print(f"An error occurred while getting the price: please, try again!")
24    except Exception as e:
25        print(f"An exception occurred while trying to get the currency value", e)
For example, suppose we want to know the price of Ethereum in EUR. We’d get the following:
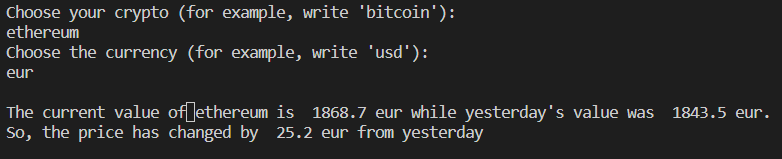
The price of Ethereum in EUR (€)
Note that the response to the GET call is the following:
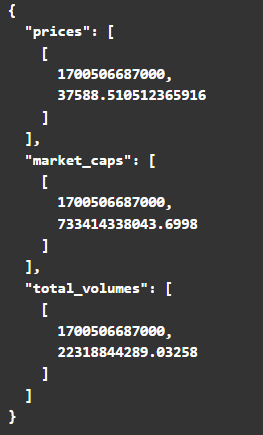
The GET response.
This is why the slicing used is:
current_value = data["prices"][1][1]yesterday_value = data["prices"][0][1]
The cvs_creation module
This module has two functions:
The function
new_csv()creates a CSV writing the header, if it doesn’t exist.The function
write_data()writes the current value of a crypto in a currency on the current date.
Using the main file
The main file is built as a menu with two options:
Option 1 writes the current value of a crypto and stores its value in the CVS, if the user wants-
Option 2 prints the difference in the value of a crypto between today and yesterday.
Let’s show how the software is expected to work:
The expected result.